We have compiled a list of manufacturers, distributors, product information, reference prices, and rankings for Inspection Equipment.
ipros is IPROS GMS IPROS One of the largest technical database sites in Japan that collects information on.

Inspection Equipment Product List and Ranking from 29 Manufacturers, Suppliers and Companies

Last Updated: Aggregation Period:Jul 30, 2025~Aug 26, 2025
This ranking is based on the number of page views on our site.

Inspection Equipment Manufacturer, Suppliers and Company Rankings

Last Updated: Aggregation Period:Jul 30, 2025~Aug 26, 2025
This ranking is based on the number of page views on our site.

  1. SOFTEX CO., LTD. Kanagawa//others SALES DEPT.
  2. null/null
  3. null/null
  4. 4 ANRITSU CORPORATION Kanagawa//Industrial Machinery Pharmaceutical Business Div. Infivis Company
  5. 5 null/null

Inspection Equipment Product ranking

Last Updated: Aggregation Period:Jul 30, 2025~Aug 26, 2025
This ranking is based on the number of page views on our site.

  1. Micro Focus Soft X-ray Inspection Device 'SHR COMPACT' SOFTEX CO., LTD. SALES DEPT.
  2. PTP sheet and tablet foreign matter inspection device "Flash Patoli FP Series"
  3. OCS Corporation Desktop Powder Quality Inspection Device PT2C
  4. 4 OCS Corporation Desktop Polymer Quality Inspection Device PS25C
  5. 5 Solder Printing Inspection Machine VP6000-V/5200-V Series

Inspection Equipment Product List

1591~1605 item / All 2036 items

Displayed results

Composite Macro-Micro Review Inspection Device (with Laser Marking)

Introducing an inspection device compatible with 6 and 8-inch wafers, equipped with laser marking.

This product is a device equipped with laser marking and marker counting functions for macro-micro inspection systems. The macro unit, micro unit, and laser marking chamber are supplied with wafers automatically by a transport unit. It allows for macro visual observation and micro microscopic observation, and can perform automatic laser marking at specified coordinates in conjunction with a higher-level system. 【Features】 ■ Compatible with 6 and 8-inch wafers ■ Equipped with laser marking and marker counting functions ■ Capable of macro visual observation and micro microscopic observation ■ The macro unit, micro unit, and laser marking chamber are automatically supplied with wafers by a transport unit ■ Can perform automatic laser marking at specified coordinates in conjunction with a higher-level system *For more details, please refer to the PDF document or feel free to contact us.

  • Other inspection equipment and devices
  • Contract manufacturing

Added to bookmarks

Bookmarks list

Bookmark has been removed

Bookmarks list

You can't add any more bookmarks

By registering as a member, you can increase the number of bookmarks you can save and organize them with labels.

Free membership registration

Warp Tester

It is ideal for inspecting the distortion and texture of transparent objects such as glass and plastic, as well as for quality checks after the annealing of glass products.

Glass is heated during the manufacturing process and shaped into various forms. No matter how excellent the shape or color may be, if it has not been sufficiently annealed, invisible internal distortions can occur in the glass. Products with distortions are prone to breaking even with slight impacts, and in extreme cases, they may naturally warp or develop cracks due to this unevenness. A distortion inspection machine can easily detect such distortions in inadequately annealed products. The rotating frame has scales distributed from 0° to 100° on both sides, with 0° representing the normal state, and the most intense distortion color appearing at the 90° position. During the inspection process, the first step is to identify the limit of acceptable products. Based on that, using the scale of the rotating frame, if the distortion color can be confirmed at a value lower than the point where acceptable products begin to show color, it can be judged that the annealing is insufficient. (However, if the annealing treatment is sufficient, distortions will not be visible. The less sufficient the annealing, the more intense the color appears. Additionally, the visible color of distortions may vary slightly depending on the sample.)

  • Other physicochemical equipment

Added to bookmarks

Bookmarks list

Bookmark has been removed

Bookmarks list

You can't add any more bookmarks

By registering as a member, you can increase the number of bookmarks you can save and organize them with labels.

Free membership registration

3D Automatic Appearance Inspection Device "3Di Series"

A 3D appearance inspection device that meets a wide range of needs for the realization of smart factories.

The "3Di Series" is a 3D automatic appearance inspection device equipped with advanced technology, aimed at improving production efficiency by applying these technologies and enhancing the overall production quality of the line. In addition to improving product and performance quality, it generates high competitiveness through reduced setup time, labor savings, and waste reduction, leading to increased productivity. 【Features】 ■ Hardware that achieves high-speed, high-precision inspection ■ Flexible hardware that meets diverse market needs ■ SAKI original software *For more details, please download the PDF or feel free to contact us.

  • Visual Inspection Equipment
  • Circuit Board Inspection Equipment

Added to bookmarks

Bookmarks list

Bookmark has been removed

Bookmarks list

You can't add any more bookmarks

By registering as a member, you can increase the number of bookmarks you can save and organize them with labels.

Free membership registration

Automatic Foreign Matter Inspection Machine (Vaccine-Related Product Model) 'AIM5023V'

Achieving high-precision inspection capabilities and shortened delivery times! Double-checking foreign substances in liquids with our unique SD system.

The "AIM5023V" is an automatic inspection machine for external foreign matter that combines a high-resolution camera and lighting to accurately capture external defects and stationary foreign objects. With its unique SD (Static Division) system, it double-checks for foreign matter in liquids, ensuring more reliable detection. It is also suitable as a multi-purpose machine for inspecting formulations with different properties. 【Features】 ■ Fewer false detections of good products, improving productivity ■ Short delivery times ■ Compact and easy-to-work size ■ Design considered for cleanliness and maintenance ■ Format changes are simple and require no tools *For more details, please refer to the PDF materials or feel free to contact us.

  • Visual Inspection Equipment

Added to bookmarks

Bookmarks list

Bookmark has been removed

Bookmarks list

You can't add any more bookmarks

By registering as a member, you can increase the number of bookmarks you can save and organize them with labels.

Free membership registration

Vial and Ampoule Automatic Inspection Machine 'AIM3000 Series'

We have achieved the integration of appearance foreign matter inspection and high voltage leak testing.

The "AIM3000 Series" is an automatic inspection machine for vials and ampoules that conducts high-precision inspections based on the inspection requirements for each product, checking for the presence of foreign particles and various other aspects. Two inspection stations are equipped with an LED lighting system that utilizes both transmitted and reflected light, ensuring more reliable detection of foreign objects. The press pin function allows for the product to be rotated 360° and inspected accurately from below using four high-voltage channels. 【Features】 ■ Modular design body ■ Equipped with a multi-inspection compatible camera station ■ Checks multiple inspection items with a single inspection station ■ 100% double-check to prevent missing foreign objects ■ High-voltage leak inspection module (optional) *For more details, please refer to the PDF document or feel free to contact us.

  • Other inspection equipment and devices

Added to bookmarks

Bookmarks list

Bookmark has been removed

Bookmarks list

You can't add any more bookmarks

By registering as a member, you can increase the number of bookmarks you can save and organize them with labels.

Free membership registration

Inspection machine for nested syringes and supply recovery line

From supply to recovery, products are transported without contact and inspected with high precision.

- Transporting products consistently in a non-contact manner from supply to recovery. - Incorporating AI technology for external foreign matter inspection of syringes to further improve inspection accuracy. - Achieving space-saving and high operability through integrated design. 【Configuration of Syringe Inspection Line】 ■ De-nester ■ AI-equipped inspection machine for syringes AIM 52S ■ Re-nester ■ Empty container transport (optional) *For more details, please refer to the PDF document or feel free to contact us.

  • Other inspection equipment and devices

Added to bookmarks

Bookmarks list

Bookmark has been removed

Bookmarks list

You can't add any more bookmarks

By registering as a member, you can increase the number of bookmarks you can save and organize them with labels.

Free membership registration

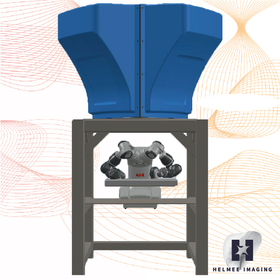
Helmee CSD, an appearance inspection machine for glossy materials such as plating.

It is an appearance inspection machine that conducts ultra-high precision inspections for defects on the surfaces of glossy materials such as plating, painting, matte, and satin finishes.

【Ultra High Precision】The detection capability of Helmee CSD is ultra high precision. It can detect defects as small as 0.03 square mm. We have received comments from customers indicating 95% accuracy, allowing us to replace visual inspections with automated inspections. 【Specializing in Glossy 3D Objects!】Especially for inspecting glossy objects that reflect light, such as plating, painting, matte, and satin surfaces, you can trust us! We can inspect curved surfaces like car door handles and faucet parts without any issues. 【Short Inspection Time!】Helmee CSD can perform inspections faster or at the same speed as visual inspections, thanks to its CSD technology based on international patents! 【What is Helmee CSD?】The Helmee CSD unit is an inspection machine for glossy objects that performs both inspection and sorting. Its specifications are designed to be used without changing your production process, determining the introduction of robots and conveyor belts accordingly. For example, it can utilize ABB's collaborative robot Yumi. 【Actual Helmee CSD Video】This shows our inspection machine conducting final stage testing at a customer site in Germany. → https://youtu.be/gAvgdYxSU78

  • Visual Inspection Equipment
  • Defect Inspection Equipment

Added to bookmarks

Bookmarks list

Bookmark has been removed

Bookmarks list

You can't add any more bookmarks

By registering as a member, you can increase the number of bookmarks you can save and organize them with labels.

Free membership registration

Steel Plate Inspection Device "Mitsukeru-kun K"

Identify the location of through cracks in the steel deck from the road surface! Steel deck inspection device using eddy current testing.

"Mitukerukun K" is a steel deck inspection device developed jointly by Hanshin Expressway Company and Nippon Densokuki Co., Ltd. using eddy current testing. The device detects changes in the internal flow of the pavement (through cracks) and identifies areas on the pavement surface that may have deck through cracks. 【Benefits of Introduction】 ■ Streamlined inspection time and effort ■ Cost reduction as temporary facilities such as scaffolding are not required *For more details, please download the PDF or contact us.

  • Flaw detection testing
  • Other measurement, recording and measuring instruments

Added to bookmarks

Bookmarks list

Bookmark has been removed

Bookmarks list

You can't add any more bookmarks

By registering as a member, you can increase the number of bookmarks you can save and organize them with labels.

Free membership registration

【Specification Table】Neural Cube *Free demo units available for loan

Achieving AI implementation in manufacturing sites with "Plug and Play".

This is the specification sheet for our product "Neural Cube." 【Features】 ~Significantly reduces the effort required for implementation~ ■ Equipped with NVIDIA Jetson-TX2 ■ Applications necessary for AI implementation are pre-installed, eliminating the need for environment setup ■ Software development can be programmed in a unified language, Python ■ Compact and durable design that can be used in various locations ・Operating temperature range: 0° to 45° ■ User-friendly interface ports ・Complete with interfaces necessary for manufacturing sites ・Designed to ensure that communication speed is not affected even when multiple connections are made *For more details, please download the PDF or feel free to contact us.

  • Other image-related equipment

Added to bookmarks

Bookmarks list

Bookmark has been removed

Bookmarks list

You can't add any more bookmarks

By registering as a member, you can increase the number of bookmarks you can save and organize them with labels.

Free membership registration

【Detailed Description Document】 Neural Cube *Free demo units available for loan

Achieving AI implementation in manufacturing sites with "Plug and Play".

This is a detailed description of our product "Neural Cube." 【Features】 ~Significantly reduces the effort required for implementation~ ■ Equipped with NVIDIA Jetson-TX2 ■ Applications necessary for AI implementation are pre-installed, eliminating the need for environment setup ■ Software development can be programmed in the unified language Python ■ Compact and durable design that can be used in various locations ・Operating temperature range: 0° to 45° ■ User-friendly interface ports ・Complete with interfaces necessary for manufacturing sites ・Designed to ensure that communication speed is not affected even with multiple connections *For more details, please download the PDF or feel free to contact us.

  • Weighing Control

Added to bookmarks

Bookmarks list

Bookmark has been removed

Bookmarks list

You can't add any more bookmarks

By registering as a member, you can increase the number of bookmarks you can save and organize them with labels.

Free membership registration

[Basic Data] Application of Deep Learning to Visual Inspection

Comparison between humans and Deep Learning (AI) application in visual inspection.

This is a comparison document between humans and AI regarding the introduction of AI visual inspection.

  • Image Processing Equipment

Added to bookmarks

Bookmarks list

Bookmark has been removed

Bookmarks list

You can't add any more bookmarks

By registering as a member, you can increase the number of bookmarks you can save and organize them with labels.

Free membership registration

Everyone is curious! Until the introduction of the AI appearance inspection device - Step 1 -

Introducing Step 1 of the 3-step process, the "PoC Phase"! We will start with desk verification using image data to determine if discrimination is possible with AI.

Step 1: The "PoC phase" refers to the stage where we receive physical sample products and conduct a proof-of-concept experiment to determine whether it is possible to classify them as OK or NG using image data. The duration is approximately three months from the time the sample products are sent. 【Flow】 ■ Image capture ⇒ Annotation (creation of training data) ⇒ Algorithm generation ⇒ Verification We will assess whether the improved accuracy of the algorithm contributes to the verification phase. After completion, we will provide a detailed report on the PoC results, including proposals for on-site implementation. *For more detailed information, please download the PDF or feel free to contact us.

  • Image Processing Equipment

Added to bookmarks

Bookmarks list

Bookmark has been removed

Bookmarks list

You can't add any more bookmarks

By registering as a member, you can increase the number of bookmarks you can save and organize them with labels.

Free membership registration

Everyone is curious! Until the introduction of the AI appearance inspection device - Step 2 -

Introducing Step 2 of the 3-step process: the verification phase with a simple jig! We will verify the challenges of introducing it into the production line at the customer's site and the actual usability.

Step 2, "Verification Phase with Simple Jigs," refers to the stage where, after confirming that sufficient accuracy has been achieved in the PoC phase, we manufacture simple jigs tailored to the target components and verify the challenges and actual usability when introducing them into the production line at the customer's site. The duration is approximately 1 to 3 months. [Flow] ■ Simple jig production (lighting, camera, GPU) @ Musashi AI ⇒ GUI development @ Musashi AI ⇒ On-site TRY @ Customer ⇒ Accuracy confirmation @ Customer * GUI: An interface that allows the customer to adjust parameters such as thresholds. By conducting the TRY at the customer's site, we will identify challenges in the production line (such as residual cleaning from previous processes, lighting conditions within the factory, contamination, etc.) and confirm and build an AI that can be used in the actual field. After completion, if you are satisfied with the accuracy, we will proceed to discussions on specifications, design, and manufacturing of the inspection equipment with an eye toward actual implementation in the field.

  • Image Processing Equipment

Added to bookmarks

Bookmarks list

Bookmark has been removed

Bookmarks list

You can't add any more bookmarks

By registering as a member, you can increase the number of bookmarks you can save and organize them with labels.

Free membership registration

[Case Studies of Automation] Inspection Equipment / Embedded Devices / Winding Machines

Introducing our case studies, including inspection devices and winding machines with a product size of 5mm³!

We would like to introduce some case studies of our company, which designs and manufactures automatic labor-saving machines. We have various equipment including an "inspection device" that conducts strength, dimension, and appearance inspections of products with dimensions of 2500mm × 1800mm × 2100mm, an "assembly machine" that incorporates parts into products, and a "winding machine" that wraps round wire around parts using multiple winding shafts. In addition, we have a wealth of case studies including "devices for mounting fine parts onto products" and "devices for weighing powders," so please feel free to contact us when you need assistance. 【Case Overview】 <Inspection Device> ■ A device that conducts strength, dimension, and appearance inspections of products ■ Product size: 5mm³ ■ Equipment dimensions: 2500mm × 1800mm × 2100mm *For more details, please refer to the related links or feel free to contact us.

  • Contract manufacturing
  • Processing Contract

Added to bookmarks

Bookmarks list

Bookmark has been removed

Bookmarks list

You can't add any more bookmarks

By registering as a member, you can increase the number of bookmarks you can save and organize them with labels.

Free membership registration